Facilitators' Help Book
| Site: | Grow2Serve Course Portal |
| Course: | Help resources for grow2serve.net |
| Book: | Facilitators' Help Book |
| Printed by: | Guest user |
| Date: | Tuesday, February 10, 2026, 11:09 AM |
Description
grow2serve.net Help Book
Table of contents
- Introduction
- Contact Us
- FAQ Full Index (in addition to links below)
- Add YouTube Videos to an Assignment
- A Day in the Life of an Online Facilitator
- How to Encourage Learners Through Reviewing Their Assignment Turn-ins
- How to Add a File to an Assignment
- How to Fix the Little Things
- How to Get More Details About Learners
- How to Log in as Another User
- How to Manage Course Emails
- How to Manage Learners Using the Activity Completion Report
- How to Track Due Dates
- How to Unenroll Participants
- How to Unsubscribe from Forums
- How to Use and Edit Your Profile
- How to View All Weeks At Once
- How to Edit the Course Banner
- Course Resources
- Our Learning Providers
- About Us
Contact Us
We want to hear from you! Feel free to send us any feedback or questions. But first, we encourage you to see if your question is answered in our frequently asked questions.
Contact Information
1.470.236.3885
Grow2Serve
12600 Johnny Cake Ridge Road
Apple Valley, MN 55124
Availability
M-F 9:00--5:00 p.m. Eastern Standard Time
We will make every effort to respond to your email and voice messages within 24 hours during the workweek. Correspondence left on weekends or holidays will be responded to as soon as possible the next business day.
FAQ Index
We have compiled answers to some of the most Frequently Asked Questions below. If you are not able to find the answer you are looking for, please feel free to contact us.
Facilitating my course
As a facilitator, you are able to create assignments. After you have created an assignment, you can insert a video file into the assignment by scrolling down the page to the Description section or the Additional Files section to add the video. In order to not use a lot of storage space on our site, we ask that you either use YouTube videos or place your videos on YouTube before adding them to the assignment. If you need assistance with adding videos to YouTube, please contact services@grow2serve.com.
The Description and Additional Files sections are where you may add files (such as answer templates, documents for reading, and videos) for use in the assignment.
Uploading files in the Description Section
- After clicking the Assignment link from the activity chooser, you can add files to the assignment.
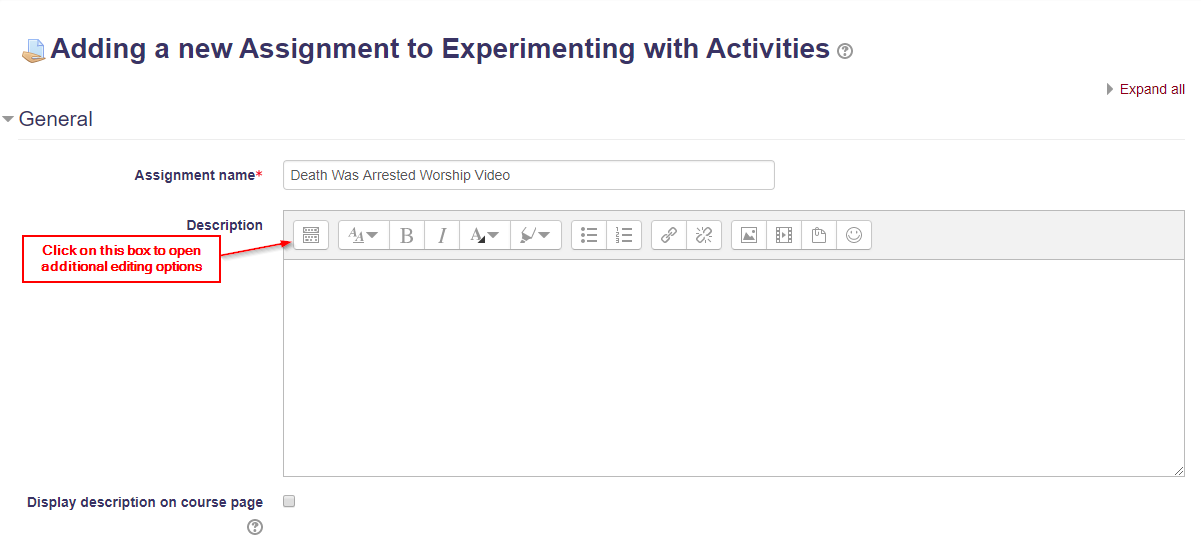
- In the description box, click on the button on the far left that says Show More Buttons when you hover your mouse over it.
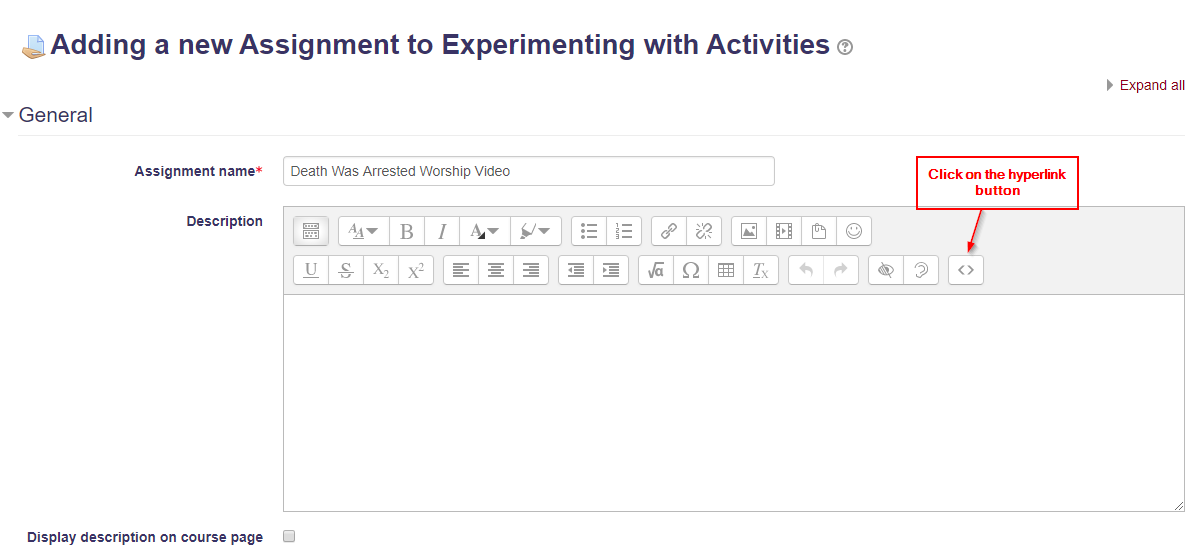
- On the far right, click the HTML button, which looks like two arrows facing away from each other.
- There is also a block (with a down-facing arrow) into which you can drag and drop a file straight from your desktop into Moodle.
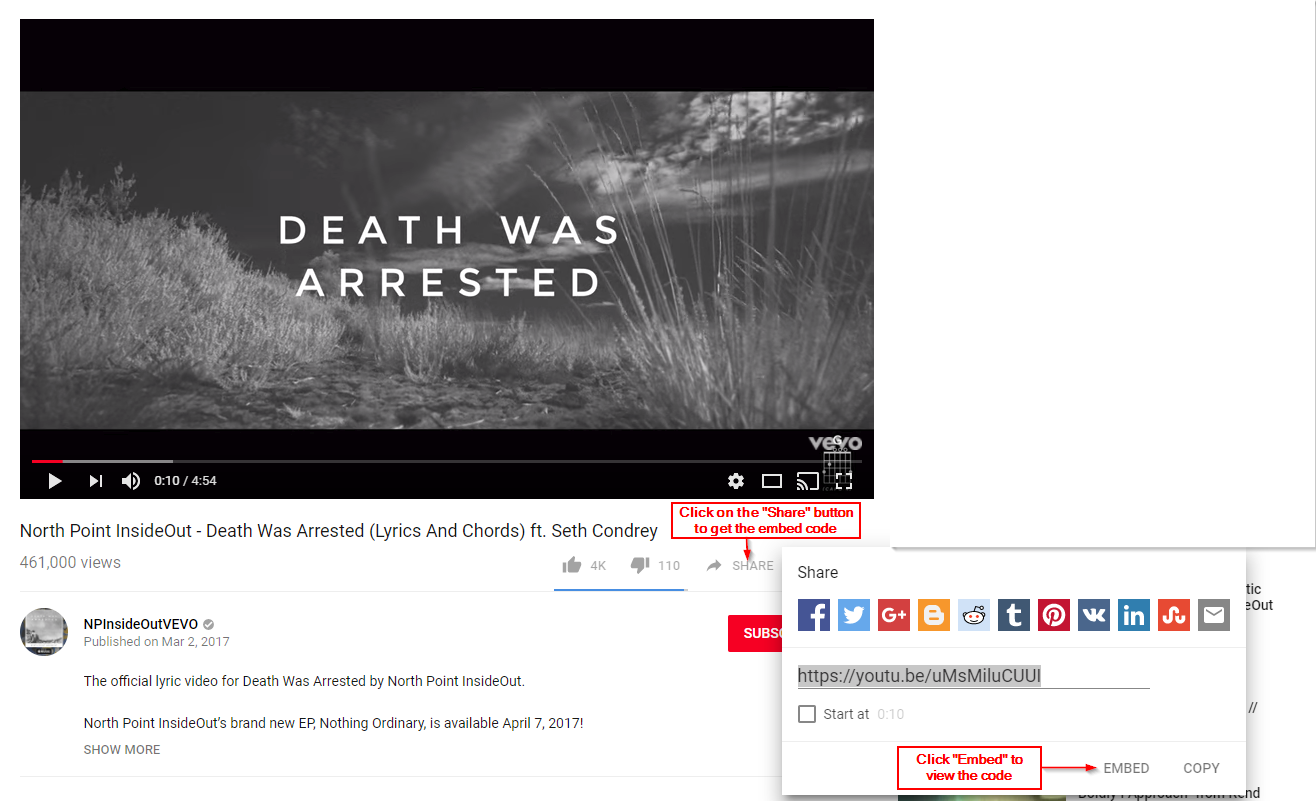
- Go to YouTube to get the hyperlink for the video. Click on the Share button and another menu will open up. Click the Embed button to get the embed code.
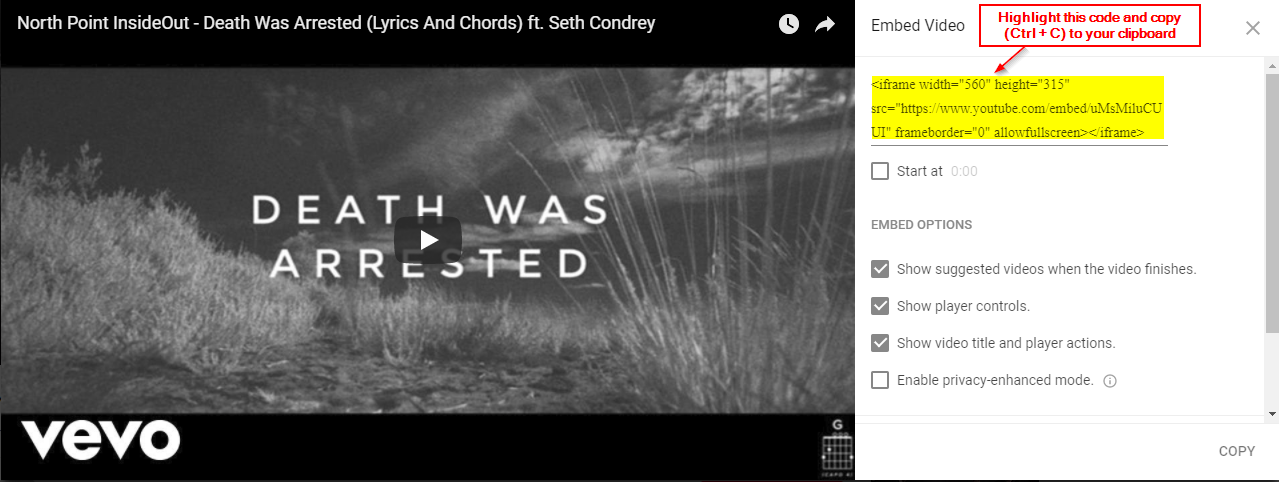
- Highlight and Copy (Ctrl + C) the embed code.
- Paste (Ctrl + V) the code inside of the description box. Click the HTML button to close the section, after you paste the code.
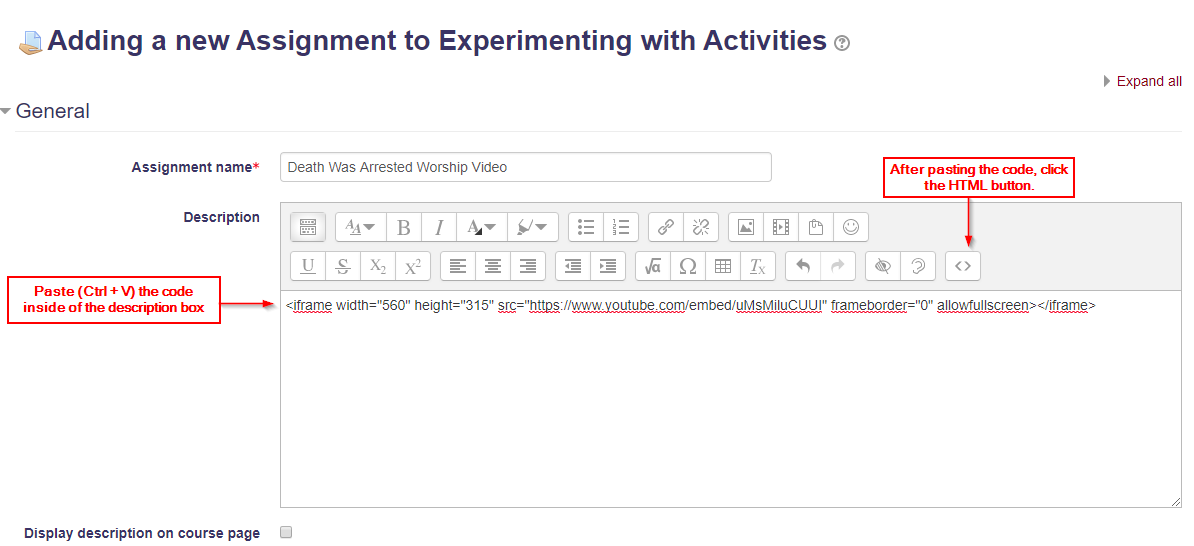
- The video should auto-populate in the description box after you close the HTML editing.
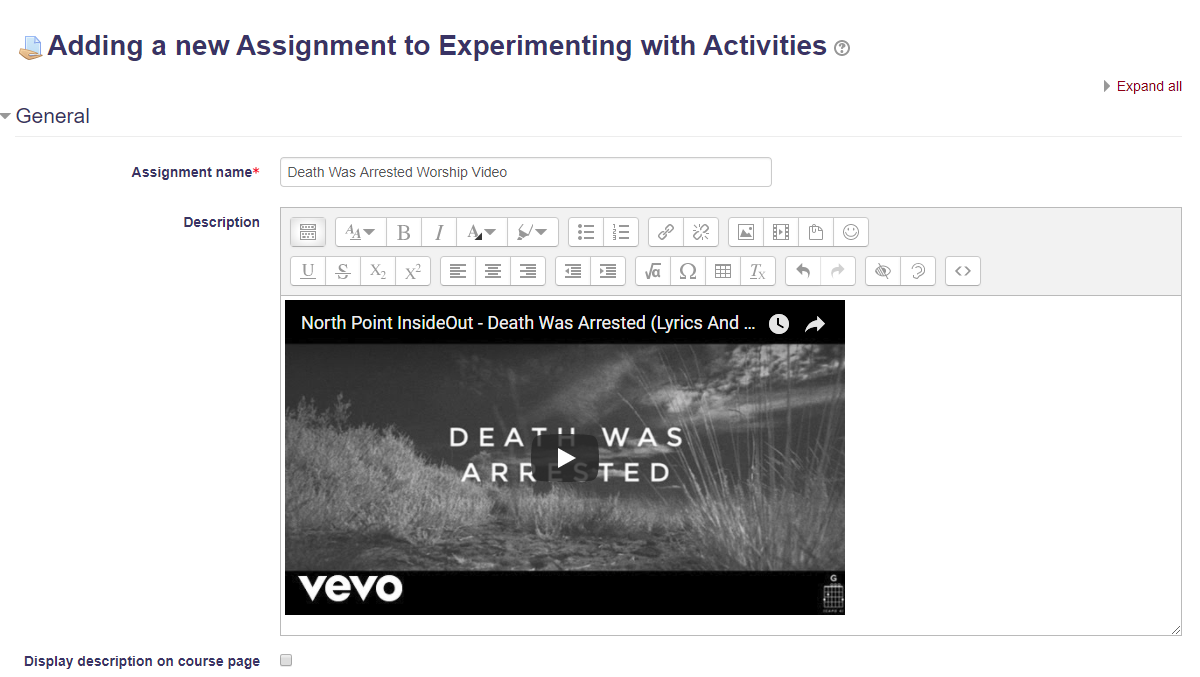
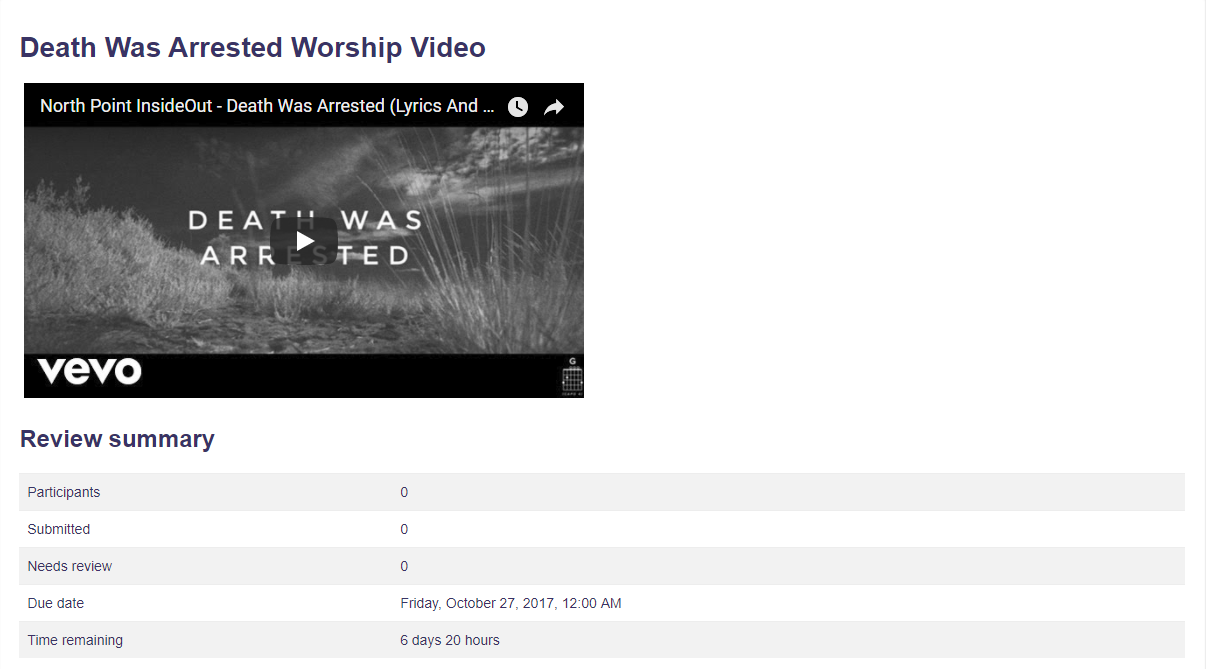
- Once you finish editing your assignment options, click "Save and display" to finish the assignment. Your video assignment should populate like this:
A big part of helping students feel motivated is is letting them know that someone is reading when they turn in assignments that they have been asked to complete. This video will help you learn how to do that effectively. There is a lot of detail given in this video, so we would suggest watching it full screen.
As a facilitator, you are able to create assignments. After you have created an assignment, you can upload a file into the assignment by scrolling down the page to the Additional Files section. The Additional Files section is where you may add files (such as answer templates and documents for reading) for use in the assignment.
Uploading files
- After clicking the Assignment link from the activity chooser, you can add files to the assignment.
- The screen for uploading and displaying a file (or folder of files) includes an "add" button. Clicking on on this button takes you the File Picker which is the name given to the file storage and access area within Moodle. Find out more about the places you can upload or add files from in the File picker page.
- There is also a block (with a down-facing arrow) into which you can drag and drop a file straight from your desktop into Moodle.
Additional files window:
File picker window:
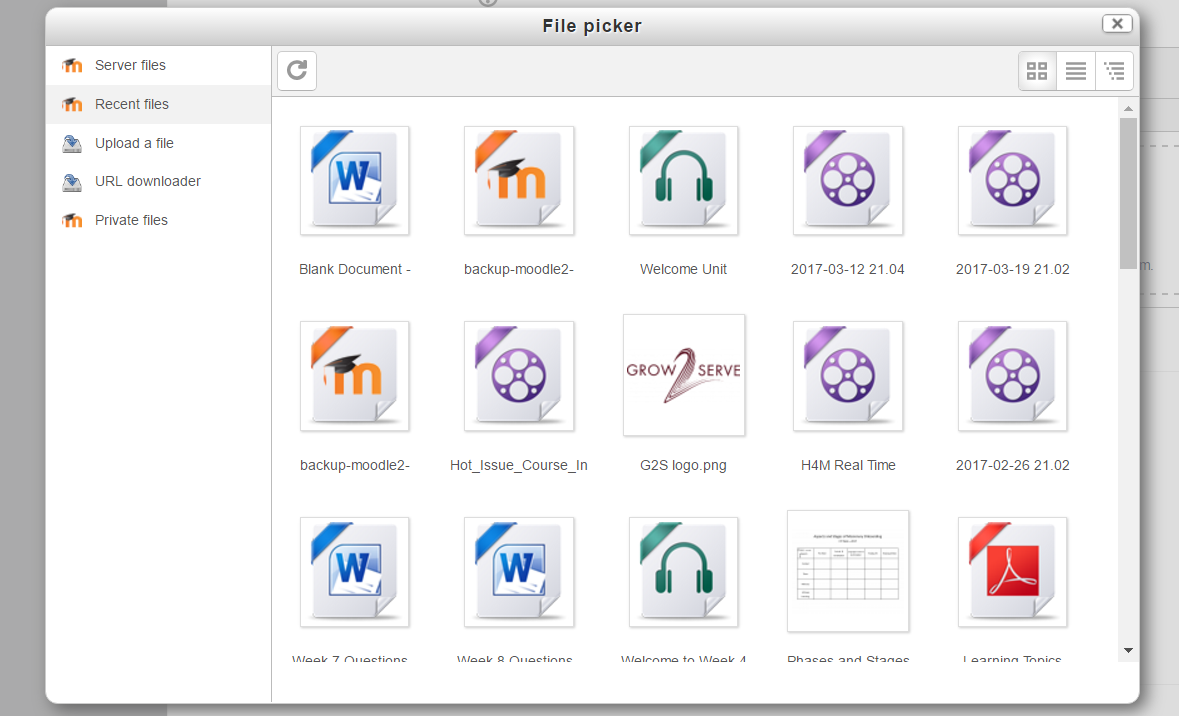
Within the File Picker, you need to select where you will locate the file (Server files, Recent files, Upload a file, URL downloader, or Private files). Additionally, you may find it in Grow2Serve's file repository, which can be found be located by navigating to the Help page.
If this is a file already on Grow2Serve's Moodle, please look for the file under Server files, Recent files, or Grow2Serve's list of file repositories mentioned above.
If selecting Upload a file, this is how the screen will appear, but you will need to list the author and select the license:
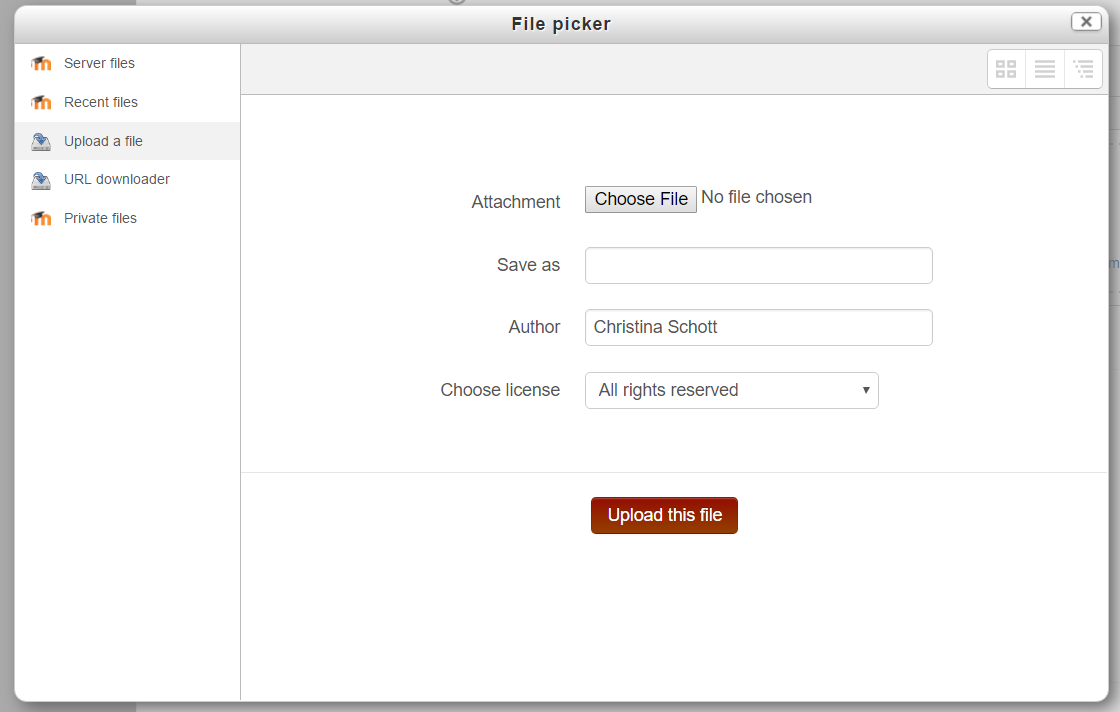
After selecting Upload This File, this is the window that will appear based on the type of file you selected to add:
Viewing uploaded files
- Once uploaded, files appear as thumbnails in the file manager for easy recognition. (See screenshot below.)
- Files view can be easily toggled between icons view or table view with sizes and dates, or a hierarchical list view. (See the documentation on the File picker for more information.)
- Click on Save and Display to view the assignment.
- When viewing the assignment page, you can click on the title or icon for the document and the file will automatically download.
Appearance of the Assignment after selecting Save and Display:
We, the staff of Grow2Serve, really desire to enter into a relationship of teamwork with all of those who facilitate courses online. With this in mind, there are a few things that you can do to help improve the learning experience across the Grow2Serve community!
As a facilitator, you have some tools available to you that are attached to each learner's profile. These will greatly help you monitor the participation and progress of your students.
There is one change to navigation from what is presented in this video. Once you have clicked on an individual's name in the course and are viewing their profile, all of the access for viewing reports, "login as" and making edits to the individual's profile are immediately available right inside the profile view.

How to Log in as Another User
As a facilitator, you may sometimes need to log in as one of your course participants. This often happens when a participant is having trouble on the site and you want to see exactly what she is seeing.
To log in as another user, you need to have a role that has more "rights" than the other user's. For example, a facilitator can log in as a participant, but a participant can't log in as a facilitator. A facilitator can't log in as an administrator.
To log in as another user:
- Click on the user's name/picture to go to his profile.
- Once you're on the user's profile page, click Log in As.
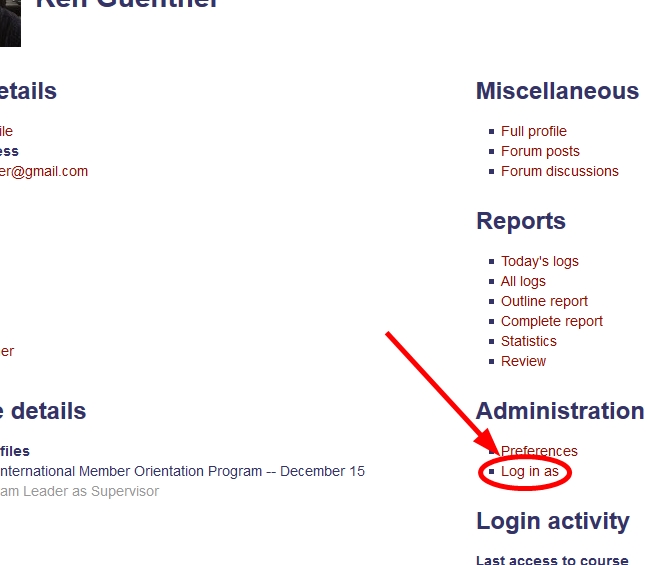
- Click Continue on the confirmation screen.

Note: When you are logged in as someone else, any action you perform on the site will be logged as the action of the user you are logged in as. For example, if you make a forum post while logged in as "Ken", then to everyone else it will appear as though it was Ken who posted since his name and picture will be displayed with the post. Thus, you should be careful not to make posts or complete assignments when logged in as someone else unless that is your intended purpose.
To return to your role, scroll to the bottom of the page and click on your name before where it says "You are logged in as."

You will be redirected to the main "log in" page where you can log in as yourself again.
How to Manage Course Emails
When you start a new course, you'll notice pretty quickly that (in most courses) you will receive several emails from that course each day. These emails are mainly to help you stay informed of the activity that's going on in your course so that you don't miss any forum posts made by your class.
However, some of you may find it overwhelming to see all of these emails in your main inbox every day. You can use the "rules" or "filters" feature in your email program to manage Grow2Serve emails in a way that is useful to you. Generally, rules and filters can be set to automatically direct individual emails (under defined conditions) to be deleted, moved, filed, or forwarded as desired. How to do this will vary by your email provider. Below we've provided links to instructions for some of the more common providers. If you don't see yours here, you should check the settings in your email or search "create email rules in [email provider]" or something similar.
Once you've learned how to manage emails using rules and filters, you can do a couple things:
- Create an email folder and a rule/filter for each course you facilitate. When you receive emails from forums and assignments, you can have them be moved automatically to the email folder you designated for your course. You will then have a folder that is constantly updated with all your emails from the course and they will not take up space in your main inbox. Each time you look at that folder (our suggestion is at least once a day), you will immediately see the most recent activity in your course. Note: Once the course is over, you can turn off the rule or filter so that any important Grow2Serve emails or updates will come straight into your inbox once more.
- Simply create a rule or filter that will delete all emails coming from Grow2Serve. Then you can manage all course activity from directly inside the course itself.
If you would like any help with this, please don't hesitate to contact Learner Services (services@grow2serve.com) and we'll direct you to some helpful resources.
One of the most powerful tools you have for keeping track of multiple learners across multiple activities all at a glance is the Activity Completion Report. Watch this video to learn more about using this awesome resource.
How to Track Due Dates
As you navigate through your courses, you'll notice that different activities display due dates in different ways. Below you'll find descriptions of the main ways you'll see these dates/times displayed.
Important Note:
Due dates with a time listed: All due dates which include a time refer to your time zone. Make sure you set your time zone in your profile so that due dates/times get updated to your correct time zone. For example, an assignment is due on Wednesday, December 30th at 8:55 PM for someone in the Pacific (Los Angeles, USA) Time Zone. It was originally due at 11:55 PM Eastern Time, but the site automatically adjusts the time to reflect this specific user's time zone.
Due dates without a time listed: In these cases, complete by the end of the day refers to the end of that day in the Eastern (New York, USA) Time Zone. You will need to mentally adjust due dates found in headings or in activity instructions if you are not in the Eastern Time Zone. For example, if you are in London, and you are to "complete your initial post by Friday," then you need to submit your work by Saturday at 4:59 AM, rather than by Friday at 11:59 PM.
In Headings
In some activities you will see the due day listed in the activity heading. In this case, your activity is due on the day listed during that current week.
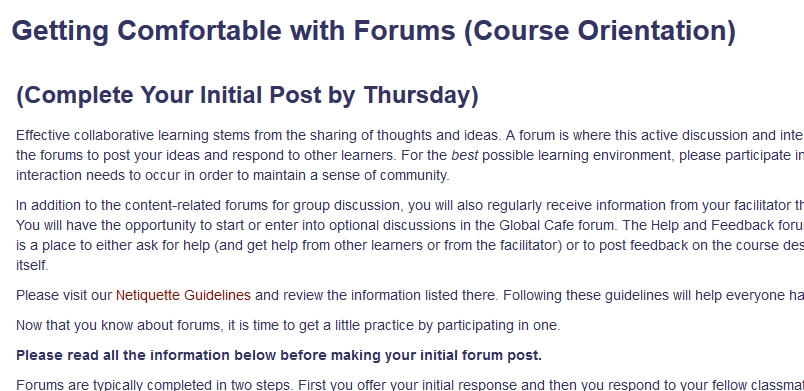
In this example, your first post in a Course Orientation discussion forum is due at the end of the day on Thursday, Eastern Time.
In "My Completion Tracking"
If applicable, assignments will also list the specific date and time they are due in the My Completion Tracking box at the bottom of the assignment page.
![]()
In this example, the assignment is due on Wednesday, December 30, 2015, at 8:55 PM. for someone in the Pacific (Los Angeles, USA) time zone. It was originally due at 11:55 PM Eastern, but the site has automatically adjusted the time to reflect this specific user's time zone.
In Activity Instructions
Some activities will list the due day in the activity instructions. This will be common for forums, quizzes, and lessons.

In this example, your initial reply is due on at the end of the day of Wednesday of Week 1 in Eastern time.
How to Unenroll Participants
As a facilitator, you will need to contact us to unenroll a participant from your course. Please contact Grow2Serve Learner Services by writing services@grow2serve.com or call (470) 236-3885.
Note: For enrollments, you'll also need to contact Learner Services. There are extra administrative steps that need to be done to ensure participants start a course smoothly, so we prefer to have Grow2Serve Learner Services do this task. Please contact us when you need to add a participant to your course and we will be happy to do so as quickly as possible.
How to Unsubscribe from an Individual Forum
- When you're inside the forum, go to Settings and click on Unsubscribe from this Forum.
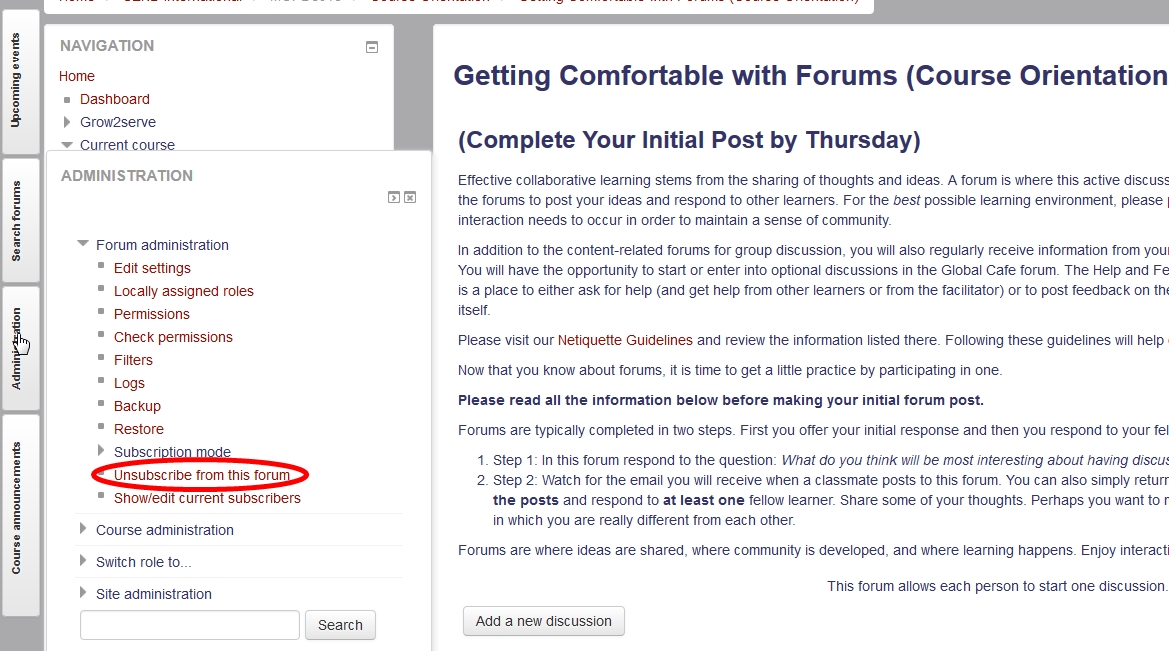
How to Unsubscribe from All Forums in a Course
- When you're inside a forum, click on Search Forums at the top, right-hand side.

- Then click on Advanced Forums in the link breadcrumbs.
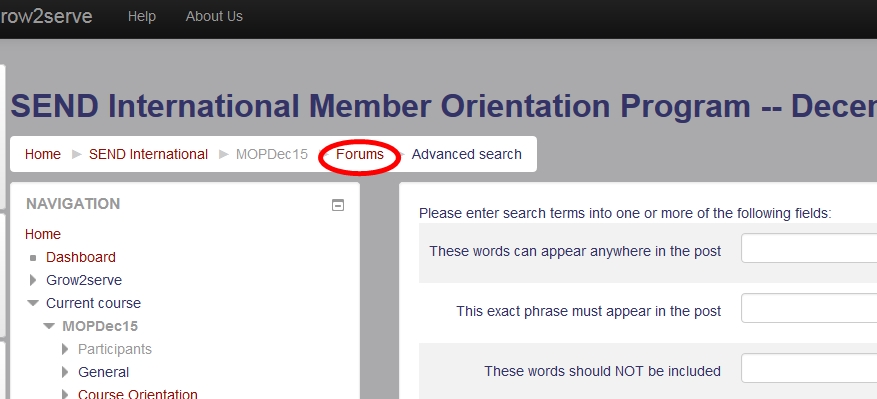
- Click on Unsubscribe from all Forums. You will be unsubscribed from all forums for which this is an option. Some forums, such as Course Announcements, do not allow you to unsubscribe from them.

How to Use and Edit Your Profile
As in any website, your profile on grow2serve.net displays basic information about you. In addition, through the settings in your profile you can manage various preferences, such as your time zone and forum tracking.
Accessing Your Profile
Once you are logged into the site, you can view your profile by clicking on your name anywhere it appears on the site. You will also always see your name at the top, right-hand side of the page, where an icon for an image is also located. The icon will change over to the image you upload for your profile picture once you upload a photo.
Editing Your Profile
Once you're on your profile page, click Edit Profile at the top left of the page under User Details. Click Expand All at the top right to see all the fields available for editing.
Required fields are marked with an asterisk and always need to be filled in. Apart from these, you can change your settings and fill in as much or as little information as you'd like to share with other participants in your courses.
In the Description box, you can tell about your work, family, hobbies, etc. so others can get to know you. You will also want to add a picture, as it helps to see a human face along with the comments you share.
When you are done setting your preferences and filling in your information, click Update Profile at the bottom of the page to save your changes.
Important: Setting Your Time Zone
This site automatically updates due dates/times based on the time zone in your profile. Thus, it is very important to set your current time zone so that the due dates/times appear correctly throughout your courses. You will find the Timezone field between Select a Country and the Description text box.
To have your time zone automatically adjust for Daylight Savings:
- For Eastern, choose “America/New_York”
- For Central, choose “America/Chicago”
- For Mountain, choose “America/Denver”
- For Pacific, choose “America/Los_Angeles”
- For locations outside of the US, choose a city in your time zone that has the same daylight savings time rules as your location.
View "How to Track Due Dates" for more information on due dates.
How to View All Weeks at Once
Generally, our courses are set up so that participants see only one week of their course at a time as they work through the material on a week-by-week basis. However, you as facilitator may want to view all the weeks of the course at once.
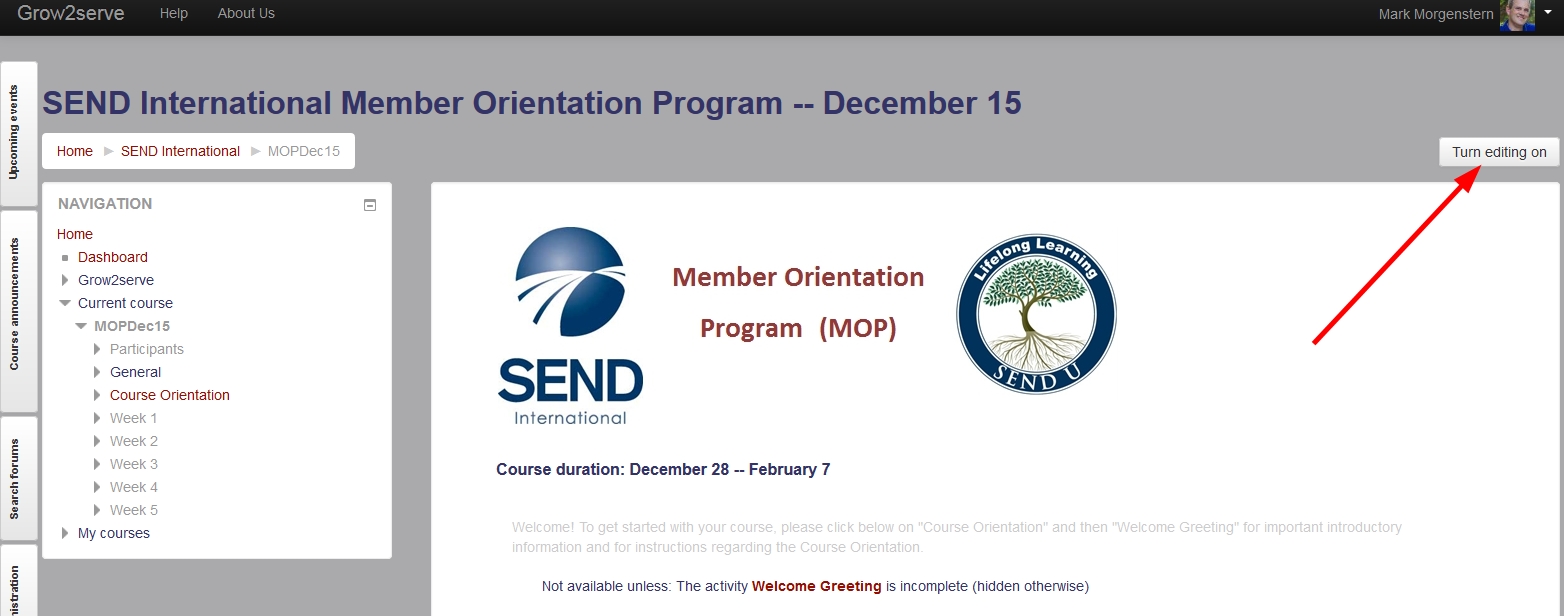
To do so, go to the main course page and scroll to the top. Click Turn Editing On on the right-hand side of the page. This will automatically give you all the editing options as well as expand every week in the course so that you can see all course elements at one time.
You can also navigate between weeks through the Navigation block on the left-hand side of the page. Weeks or course elements that are not visible to participants appear grayed-out, but you, as facilitator, can still view them. Click on the little arrow to the left of a week or section to display all the elements in that week/section.
How to Edit the Course Banner
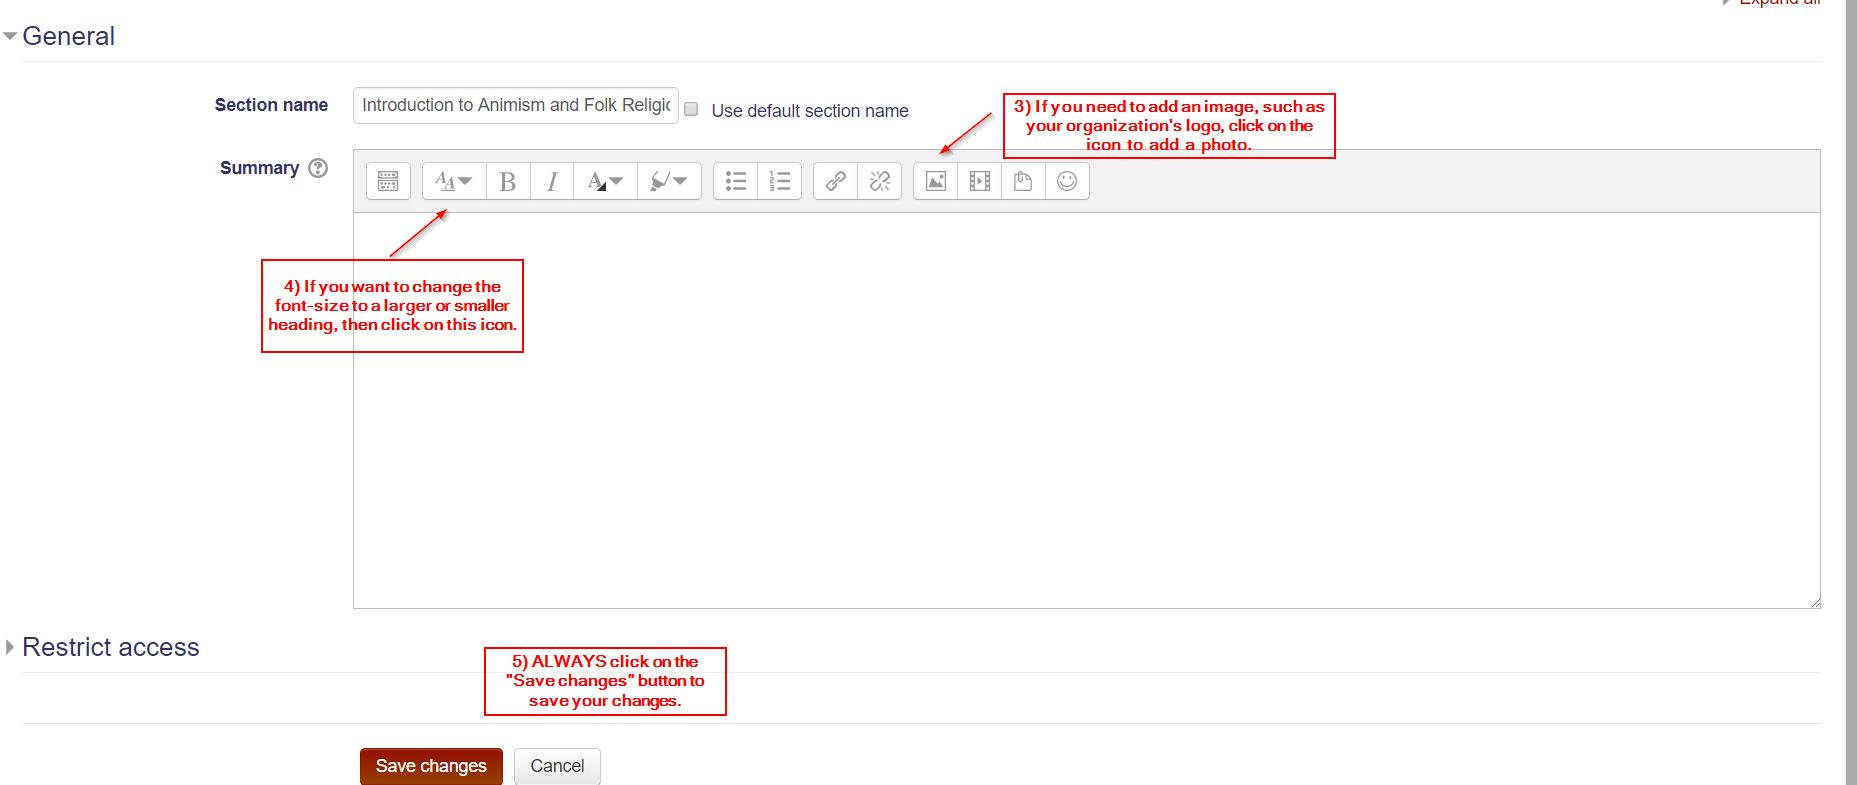
You may want to add an image or logo to the top of your course page (also known as the banner). Here are a few simple steps to edit that section of the course, or any other top of a module:
First, you'll need to click the Turn on Editing button located at the top right of the course page. Second, you need to click on the Settings icon located on the left side of every course module/section.

After you click on the settings button, you'll see an editing box (shown below).
If you are uploading an image, file, or video, please consider using your course's file repository area. This allows us to limit the amount of storage we use on Moodle. If you're unfamiliar with using the file repository, please see the instructions by clicking here. Should you need further help, please contact services@grow2serve.com.
Computer and Internet Requirements
Is your computer ready for you to take a course on grow2serve.net?
You will need:
- A browser that is up to date. grow2serve.net will work best on the latest version of Firefox.
- A high-speed Internet connection. Dial-up or a slow connection can almost double your work time.
- A digital image to use as your profile picture.
- An email account that is personal to you and not being used by another user on grow2serve.net.
- The following installed on your computer:
- A word processor (such as Word, Notepad, etc.) to turn in written files (for some courses)
- A media player if you wish to watch/listen to course audio and video files
- Speakers or headphones for listening to media
- The latest Adobe Reader or other program to view PDF files
Questions? Contact us.
Navigating within Your Course
The most basic interaction with your online course on grow2serve.net will require you to know how to navigate effectively within the course main page, weekly page and activities.
Course Main Page
This is an example of a course main page:
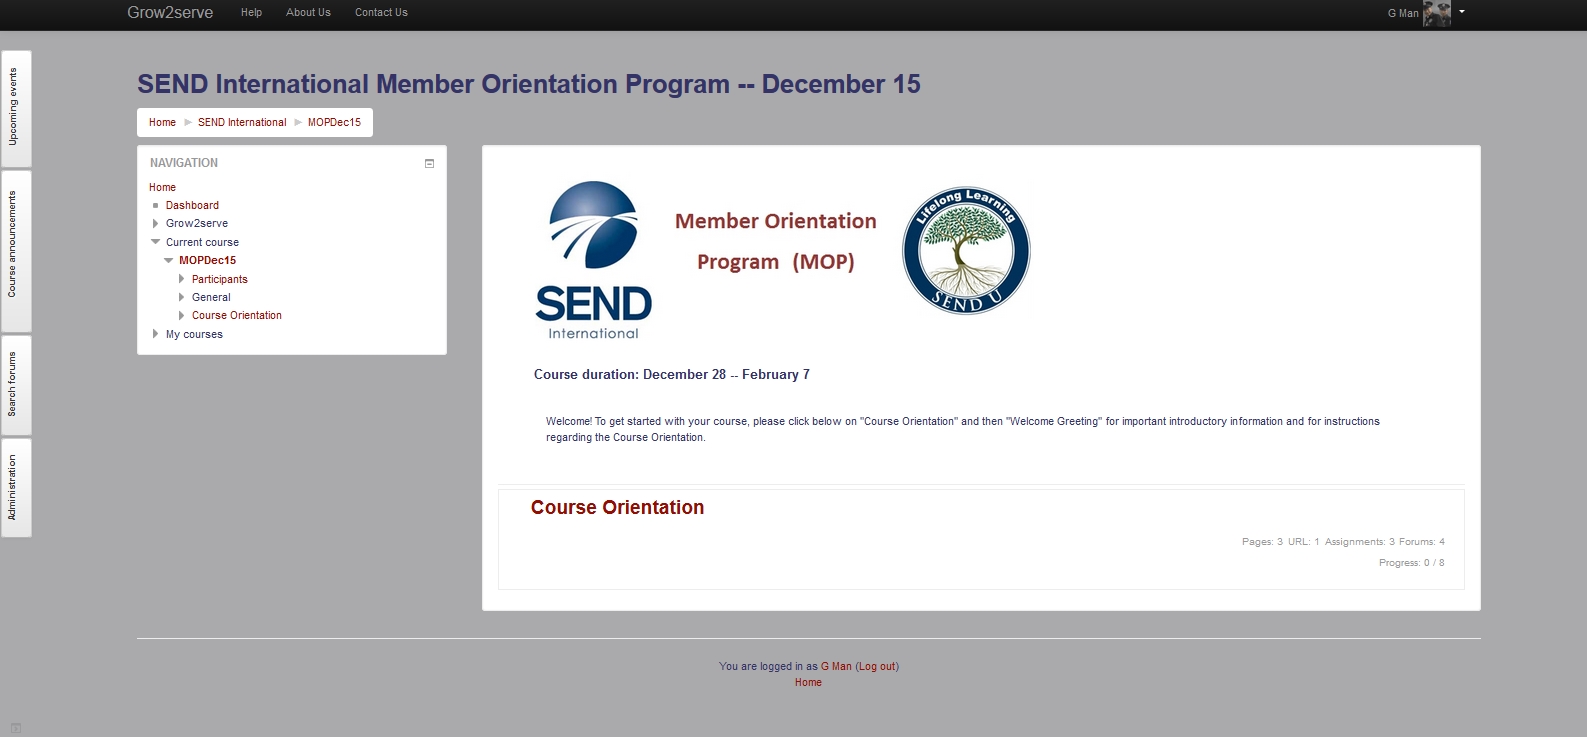
The course main page consists of five (5) regions, each of which you will want to be familiar with.
Header
The first region of the course main page is the Header:

The Header contains four important elements: 1) the name of the course, 2) a pull-down for user-specific settings, including your Dashboard, Profile, Preferences, and Log Out, 3) breadcrumbs that show where you are in the course, and 4) menu links to Help, About Us and Contact Us.
Clicking on your name (2) will take you to your grow2serve.net profile.
Clicking on any of the words in the breadcrumbs (3) will take you to that location in the site or course. For example, clicking on the "shortname" of your course ("MOPDec15" in the example above), will take you to the main page of your course.
Navigation Block(s) and Docked Navigation Block(s)
The next region of the course main page is the Navigation tray on the left:
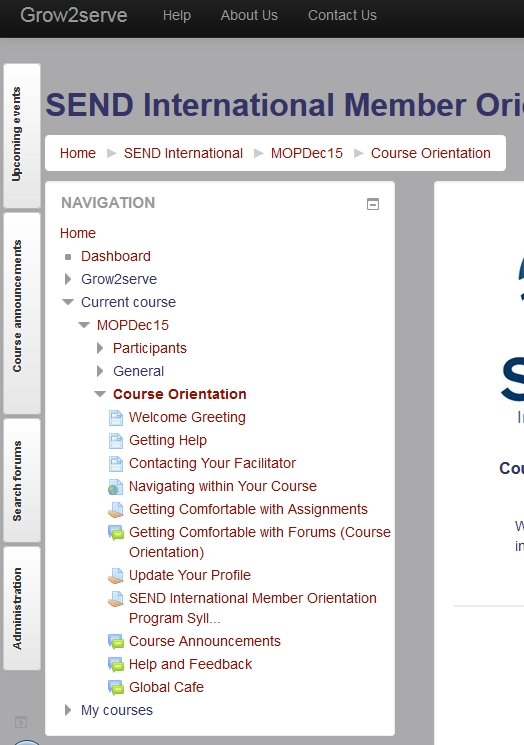
The Navigation block region may contain one or more navigation blocks that provide quick links for you to move around grow2serve.net conveniently. If blocks are not visible in expanded form, they will be present on the far left edge of the page in a smaller format stored in the "dock."
Dock for Navigation Block(s)
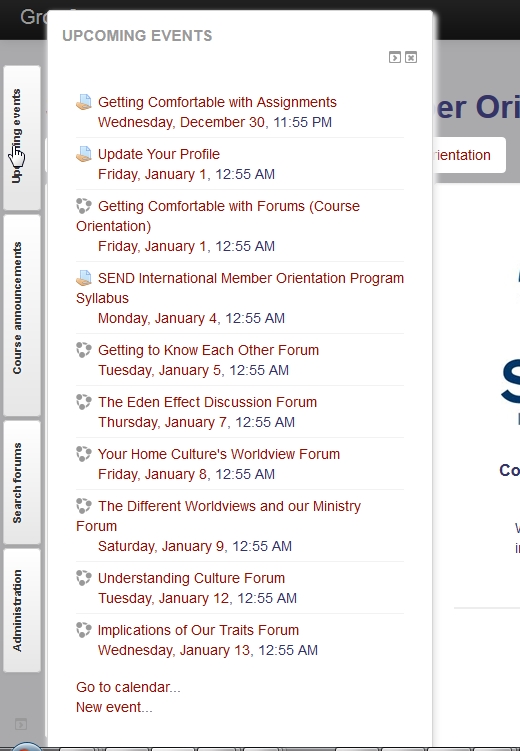
As seen in the above picture, the dock consists of a series of small versions of the various blocks available in the course. As you hover over one of the blocks, it expands and the links within the block become available. In addition to the navigation block (which always stays in an expanded format), the following blocks can be found docked on the left edge of the page:
- Upcoming Events: a list of the most imminent due dates and other events in your course. This block also contains a convenient link to the Course Calendar, in which all due dates for all activities are displayed in a graphical format.
- Course Announcements: course announcements posted by the facilitator
- Administration: contains links for adjusting administration settings
- Search Forums: a convenient tool for searching for specific discussions that you may have trouble finding otherwise.
Please note that you have the freedom to move blocks back and forth between the dock and the expanded format. However, the recommended layout is to keep the navigation block in the expanded form and the remaining blocks in the dock.
Footer
Moving counter-clockwise, the next region of the course main page is the Footer.

The Footer contains an additional links for going to your Profile, Logging Out, and viewing the Home Page of grow2serve.net.
Content Pane
The final region of your course main page is the Content Pane:
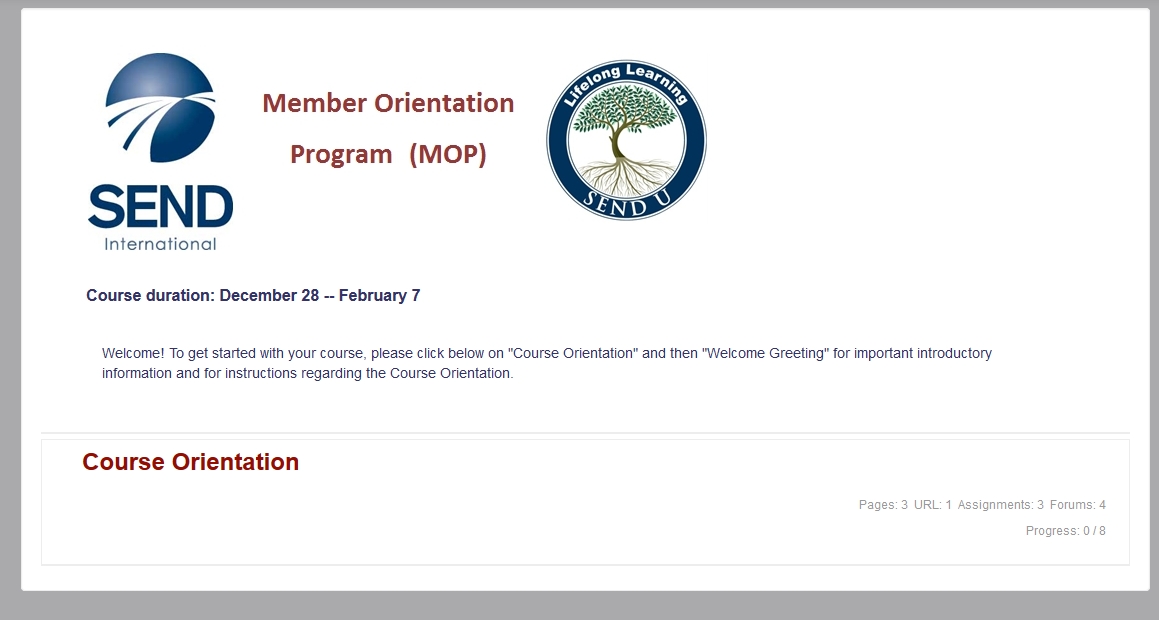
The Content Pane contains a header, a list of all of the topics/weeks of your course, and a status report for your completion of elements within that week or topic. Listed is the number of various types of elements followed by a progress report (i.e. 0/8 in this case) which indicates the number of items completed out of the total "markable as complete" items in the topic. Some items in a topic (like optional items) cannot be marked as complete.
Week Page
Clicking on the name of one of the topics or week will take you to the week page:
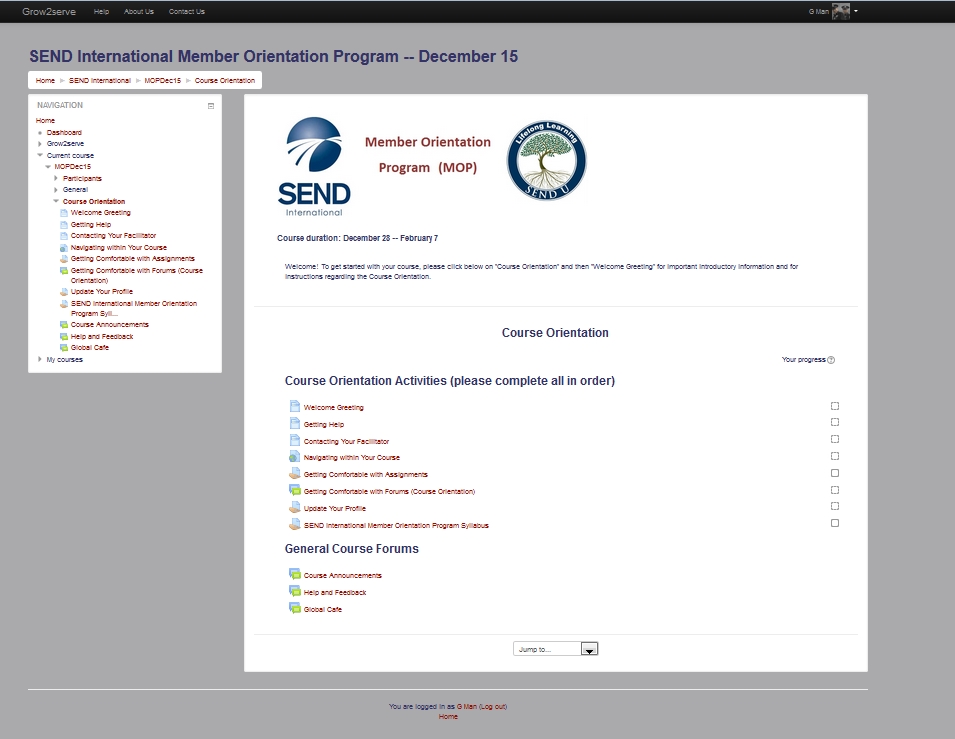
Notice that the week page has all the same elements as does the course main page. However, the content pane displays different information than the course main page.
Each element of the week or topic is displayed in the order in which the activities should be completed. Each activity has an icon to the left of the name of the activity indicating what kind of activity it is (assignment, forum, quiz, etc.) Clicking on the name of the activity will take you directly to that activity.
The check-boxes to the right of the name of an activity indicate the completion status of that activity. Solid check-boxes are for activities that you as the learner will need to manually check off in order to show that activity as complete. Dashed check-boxes will be filled in automatically by the system as you complete the instructions given in the activity.
General Tips for Learning on grow2serve.net
We are glad you’ve joined us for this adventure! Have questions? Take a look at the other resources in the Help Book.
We've also put together this list of tips to help you through online learning:
- Schedule your times of course participation on your weekly calendar. Three or four blocks of about one hour each spread out throughout the week will work much better than four hours of cramming in one night.
- Post early and post often when participating in a forum. Many of the small group dynamics you learned in group Bible studies also apply to participating in a course.
- Watch for the “time out” effect. Whenever you start entering text in grow2serve.net, whether for an assignment or as a discussion forum post, the clock is ticking. The site will drop your connection if it sees no activity after two hours. The same as any other web page, grow2serve.net only knows you are actively doing something when you either open a new page or click on a link. You may be typing a long answer to an assignment, get interrupted, and then come back only to discover that your session has timed out and all of your work has been lost. If you are composing a longer response or one that requires a lot of reflection, you may want to write it somewhere else first and save it to prevent the "time out" loss. Then, when you are ready to submit it, you can copy and paste it into the discussion forum or assignment page. (Keep in mind that formatting often doesn't transfer correctly from one program to another and you might need to make some adjustments when copying over) After posting, you have 30 minutes to go back and edit it if needed.
- Feel free to share information about yourself in your profile. It will enrich your learning/community experience and that of other learners if you know more about one another. The only people who can see the information in your profile are those enrolled in a course with you.
- Keep moving. If you get stuck on something in a course or your computer is not cooperating, mention the difficulty to your facilitator, and then move on to the next element in the course. Don't let one issue keep you from working on what you can.
- Plan your work time according to your internet speed. If your Internet connection is slow, plan for additional time to complete online assignments. Use the tab feature of your browser to open multiple pages on your course at the same time so that the next page is always loading while you are reading or responding to a forum. See the "computer requirements" for more information about Internet requirements.
- If you get behind in a course, first work on the material for the current week, and then go back and catch up on past material that you missed.
- Use the home page of your course as your home base. Everything else (email, activity lists, etc.) are supplemental tools, but the home page is the best tool for keeping track of your course.
- If you do not prefer to read things on a screen, just copy and paste the material onto a Word document and print the readings out on paper.
- Set your page zoom. Most browsers will zoom in and out on web pages if you click "ctrl +" and "ctrl -".
- Get help when you need it. Check the FAQ in the Help Book for various helpful resources. If you are still having trouble, contact your facilitator. You can also always contact us directly.
Netiquette Guidelines
Netiquette is Internet etiquette, or guidelines and good practices for online communication in emails, discussion forums, and chat rooms. Please practice the following guidelines when posting to your course.
General Guidelines
- Format your text so it is easy to read. Try to use standard paragraph spacing, indentation, and legible font. Try to be consistent with your formatting, including font size, color, etc.
- Be concise and to the point in your communication. Limit discussion forum posts to a few paragraphs. Proofread and edit your work before posting.
- Avoid the use of ALL CAPS as this may be interpreted as shouting by other readers. Using only lowercase letters can also make your text more difficult to read. Overall, use good punctuation and spelling. Use emoticons sparingly, if at all.
- Avoid "texting" abbreviations, such as "OMG" or "IMHO".
- Respect the privacy of communication within a course. Do not publicly forward the comments of fellow learners to others outside the course.
Forum Guidelines
- Give your post a unique and descriptive title.
- Formulate your initial responses carefully and re-read everything before you submit. Use the spell check button in the editor. You may need to click on "show editing tools" on the tab at the top of the editing box in order to see the spell check tool and other editing tools.
- Be a good "listener". In other words, read and re-read your fellow participants' posts before making a response so you can be sure you really "heard" and understood their insights.
- Avoid ranting about a topic or a person. Practice civil discussion.
- Stay on topic in a discussion. If you want to talk about topics unrelated to a discussion, use the Global Cafe in your course.
- Respect the fact that participants have varying degrees of sensitivity, and that even some well-meaning constructive suggestions or comments may be misconstrued as public criticism. Thus, please refrain from sharing comments in ways that might be misinterpreted, or do so privately when appropriate.
Our Learning Providers
Grow2serve.net is a learning platform used by and contributed to by many Christian ministry organizations. Current contributors are:
- Center for Intercultural Training
- COMMA
- Elim Care Faith Community Nurse Network
- EFCA Reach Global
- SEND International (for more info, see SEND U training opportunities)
- World Team
Contact Us if your organization is interested in being a learning provider on grow2serve.net.
About Us
Grow2serve.net is a collaborative learning community owned and operated by Grow2serve.
Learn more about Grow2serve here.

